

INTRODUCTION -
VICTORY IN THE PACIFIC is a simulation of the strategic naval war in the Pacific in WWII, from the first attack on Pearl Harbor to the decisive Battle of the Philippine Sea in late 1944 Although all the major combat ships in the Japanese and Allied navies are portrayed in the game, and although the game board shows all the Pacific battle areas from Pearl Harbor to Ceylon, this game is only a simple simulation of the war on a strategic level, with most of the tactical details represented by artificial, simple game mechanics As a result the game is easy, fast and fun to play, but it is not as realistic as a normal simulation or wargame
VICTORY IN THE PACIFIC applies the game system from Avalon Hill’s popular WAR AT SEA (which is about the British struggle against the German fleet in the Atlantic) to the wide seas and enormous fleets of the Pacific Due to the greater magnitude and scope of the Pacific war, it is larger and more complex than WAR AT SEA, but VICTORY IN THE PACIFIC is still basically an introductory game suited for players who want a simple, easy game If you feel that this game is too unrealistic or luck dependent for your taste, there are many other Avalon Hill games that are more realistic and challenging If you find this game enjoyable, you may wish to progress to our other Introductory games, if, on the other hand, you find VICTORY IN THE PA CIFIC far too simple you should try an Intermediate level game The most advanced games are our Tournament level games—these are great fun, but they can be complex, ~o you will probably enjoy them most alter mastering the tricks and ploys of an Intermediate game Our enclosed catalog lists our games with their ratings Welcome to the fascinating and fast-growing hobby of simulation gaming’
1. OBJECT -
VICTORY IN THE PACIFIC is a two-player game with one player controlling the Imperial Japanese Navy and the other player having the Allied fleets (the United States’ Pacific Fleet and Asiatic Fleet, and the British Eastern Fleet) The object of the game is to “control” the thirteen sea areas on the mapboard during the eight turns of the game. Each turn the players get “Points of Control” (hereafter referred to as POC) for the sea areas they “control”, at the end of the game the player with the most accumulated POC wins the game!
The number of POC that a player gets for controlling a sea area is printed on that sea area on the mapboard There are two POC numbers in each area, one that the Japanese player gets if he controls the sea area, and one that the Allied player gets if the Allies control the sea area, the POC numbers are different for each player, and vary from sea area to sea area, because each side’s POC number reflects how valuable that particular sea area was to that sid&s war effort For example, Indonesia was crucial to the Japanese war effort, so the Japanese player gets three POC for controlling it. while the Allied player would get only one POC there, for the Allies the crucial sea areas are the Hawaiian Islands, U S Mandate and Coral Sea—the areas on the vital Hawaii-to-Australia supply line
To “control” a sea area a player must have a “patrolling” surface ship or a land-based air unit at sea in that area at the end of the turn Only one player at a time can “control” a given sea area, so if both sides have units in the same sea area the units must fight until one (or both) side’s units have all retreated or been sunk The players use their capital ships, land-based air and amphibious units to control areas themselves and to prevent the enemy from controlling areas The players are free to use their units to implement the strategies that were actually tried during the war, or they can try strategies that the actual combatants discarded— or never even considered
2. THE MAPBOARD -
2.1 The mapboard portrays the sea areas, major ports and island bases that were the centers of fighting in the Pacific during World War 11 The thirteen sea areas are the large blue areas, separated from each other by white lines Major ports are the eight red circles and areas, and island bases are the fourteen green circles and areas, that are located within these sea areas or along the border between two (or three) sea areas, a port or base is assumed to be part of every sea area that it touches, so Guadalcanal (for example) is part of both the South Pacific Ocean and Coral Sea sea areas.
2.11 New Guinea is divided into two island bases, north (labelled “Lae”) and south (labelled “Port Moresby”) Lae touches the South Pacific Ocean and Indonesia sea areas only, and Port Moresby touches the Indian Ocean and Coral Sea sea areas only These two bases do not even touch each other-~they are separated by the Owen Stanley Ridge (the mountain ridge pictured on the board), which blocked large-scale military operations As a result, land units cannot move directly between Lae and Port Moresby—they must go to sea and invade to get around the Owen Stanley Ridge
2.12 Note that the entire Philippines comprise one island base that touches both Indonesia and the Marianas Islands
2.13 The brown areas on the mapboard are not used in the play of the game and are shown on the board solely to illustrate the geography of the Pacific Ocean
2.2 Each sea area, major port or island base can be controlled by either side, and each area, base or port can change sides from turn to turn Counters are placed on each area, base or port with the proper side up to indicate possession
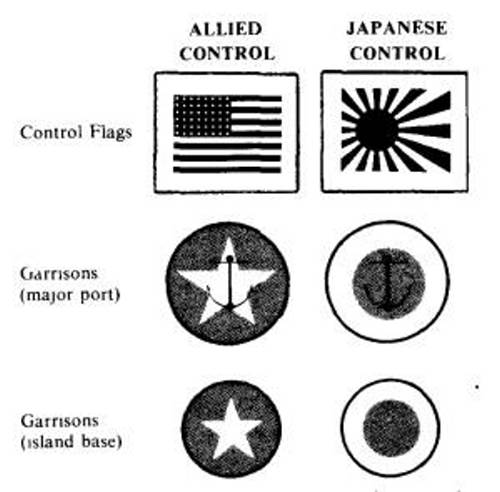
2.21 The rectangular Control Flag counters are placed on sea areas, one Control Flag per area with the appropriate flag face up to indicate who controls that sea area that turn
2.22 The eight large circular counters with anchors on them are Garrison counters that are placed on the eight major ports on the board (colored red, with anchors on or near them) The red circle (the Japanese Army symbol) is turned face up to indicate Japanese control, and she white star is turned face up to indicate Allied control
2.23 The fourteen small circles are Garrison counters that are placed on the fourteen island bases on the board, with the red circle indicating Japanese control and the white star indicating Allied control
2.3 Each major port or island base can be used only by the player who controls it that turn Every port and island base is in operation throughout the game, but only for the side that controls it
2.4 As a general rule, ships and other units move onto sea areas during turns and return to (friendly) bases or ports between turns
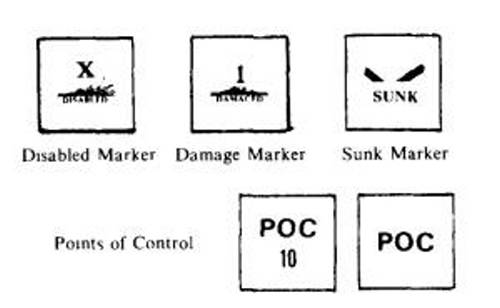
2.5 The POC TRACK on the board is used to keep track of the players’ relative POC accumulations Each turn, each player totals the POC listed for his side in all the sea areas he controls that turn, the POC totals are subtracted from each other, and the player who gained the most POC that turn gains the difference and moves the POC counters along the POC TRACK to reflect the number of POC he gained over his opponent that turn (SO if the Allied player gained 10 POC and the Japanese player got 7, the Allied player would gain 3 POC, and he would move the POC counters to show a gain of 3 POC) Japanese gains are shown by moving the markers towards the red end of the track, Allied gains towards the blue-numbered end The “POC 10” counter is used on the JO’s track to keep track of multiples of 10 POC, if either player gets 29 POC ahead (the largest number that can be shown on the track) he can gain no more, and stays there until his opponent starts gaining POC back
3. THE PLAYING PIECES
3.1 Ships The game contains four different sets of large, differently colored playing pieces that represent the capital ships of the four navies that fought in the Pacific the United States Navy (colored blue), the Japanese Navy (colored red), the British Navy (colored dark green) and the Australian and Dutch Navies (colored light green—the “De Ruyter” is the only Dutch ship in the game) These ships are referred to as “ships” or “surface ships” in these rules (note that the I-Boat and the F-Boat are not “surface ships”—they are submarines) The following diagram explains the symbols on the ship counters
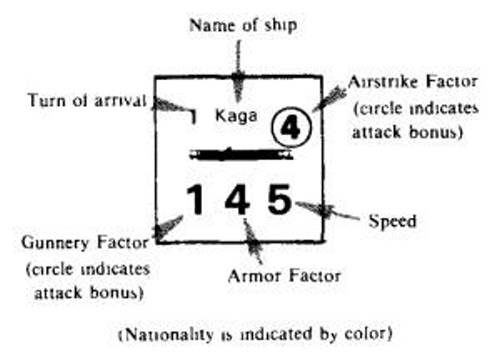
Gunnery Factor—Number of dice the ship rolls when attacking during a “night action”
Airstrike Factor—Number of dice the ship or unit rolls when attacking during a ‘day action”
Armor Factor—Number of damage points a ship or unit can have without sinking (Note is doubled for ships in port) Must have more damage points to sink
Attack Bonus: add Ito each die roll when the circled factor attacks
Turn of Arrival: The turn (1-9) that the piece enters the game letters indicate the starting positions of Allied pieces that are on the board turn I “P”—Pearl Harbor, “H”—Hawa,an l~lands, “U”—U S Mandate, “C”—Coral Sea, “A”—Australia, “B”—Bay of Bengal, “l”—lndonesia, “S’ ----Singapore, “M”— Philippines, “W,X,Y,Z”—”LOCATION UNCERTAIN”
Surface ship counters are printed on both sides The front side is printed in color, with the ship silhouette prtnted in black, when the ship is placed in a sea area with this side face up, the ship is patrolling in that sea area The reverse side of each ship is white, with the ship silhouette printed in the appropriate color, when the ship is placed in a sea area with its white side face up, that ship is raiding and attacking enemy patrollers instead of patrolling
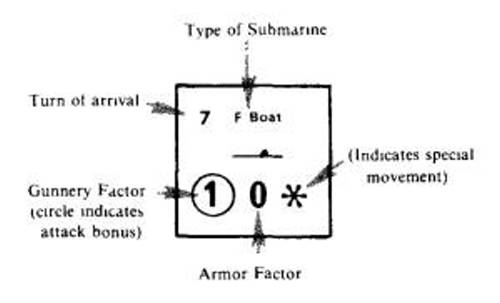
3.2 Submarines There are two large counters representing submarines the Japanese 1-Boat, bearing a red circle, and the United States’ F-Boat (“Fleet Boat”) bearing a blue star Symbol explanation:
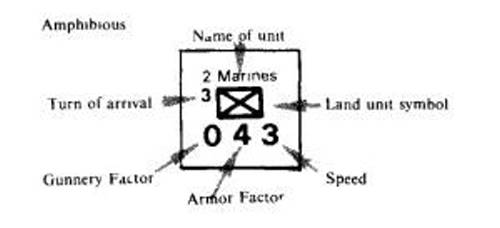
3.3 Air and Ground Units The middle-sized playing pieces are “land-based air Units” and “amphibious” Units The Japanese units are yellow and the Allied units are green. The Counters:
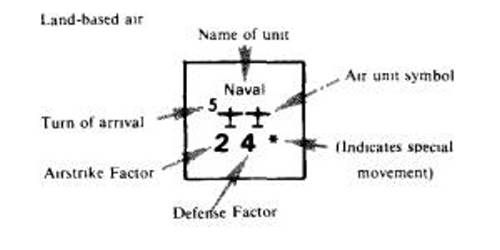
Defense Factor—Number of damage points it takes to eliminate an air unit The air unit is sunk if it takes that much damage or more.
3.4 Control pieces The rectangular pieces and circular pieces are placed on the board to show which side controls each sea area, major port and island base.
3.5 The small white counters are playing aids used to mark disabled, damaged or sunk ships, and to keep track of POC on the POC TRACK.
4. THE ORDER OF APPEARANCE CHARTS
4.1 The order of appearailce charts indicate what ships and Units both sides have at the start of the game, where they must be placed at the start of the game, what sea areas, major ports and ~sIand bases both sides control at the start, what ships and units enter the game later during play, and the repair points that are available each turn.
4.2 The Japanese player takes the JAPANESE ORDER OF APPEARANCE card and places each playing piece on the square identified for that piece Then he places control pieces on all the sea areas, ports and bases he controls at the start, which are listed under TURN I on his chart Then he takes as many as he wishes of his ships listed at YOKOSUKA NAVY YARD on turn I and places them in the PEARL HARBOR RAID rectangle—only ships with a speed of 5 or better can be placed in the PEARL HARBOR RAID rectangle. Finally, he places all his ships in the PEARL HARBOR RAID rectangle in the HAWAIIAN ISLANDS sea area, and places all the rest of his ships and units listed under TURN I on YOKOSUKA NAVY BASE He is ready to start the game.
4.3 The ships and units that the Allied player has available at the start of the game are listed on the ALLIED STARTING FORCES chart on the back page of this booklet, and the rest of the Allied pieces that arrive on later turns are listed on the ALLIED ORDER OF APPEARANCE chart The Allied player places all of his ships and units on the squares identified for them on these charts He places his Control pieces down on the areas, ports and bases listed for Allied control, then he takes all his TURN 1 units and places them on the sea areas, ports and bases listed for them (Groups W, X, Y and Z are left on the STARTING FORCES chart—they enter the game during the first turn).
4.4 At the start of each turn during the game. both players consult their order of appearance charts and place all their units listed for that turn on the major ports listed for those units Land and air units that are returning after having been eliminated or used up on previous turns may be placed in any major port under friendly control Then the players must remo”e from play any ships that are listed under REMOVALS for that turn, these ships are out of play for the rest of the game.
4.41 If ships or units are listed as arriving at a port that is controlled by the enemy, the ships or units are lost instead Exception “Pearl Harbor” reinforcements may come on at Samoa if Pearl Harbor has been lost.
4.42 Removals The Allied player must come as close as he can to removing the exact British ships that are listed as removals If a ship that is listed has been sunk, he must remove another British ship of the same type in its place—a battleship (a 4-4-3,4-4-4,4-5-6 or 3-3-6) in place of a battleship, or a 0-2-7 carrier in place of a 0-2-7 carrier (the Hermes is not treated as being the same type as 0-2-7 carriers) If all the ships of the listed type are sunk, then the Allied player must remove some other British ship (of his choice) in place of the listed ship United States, Australian or Dutch ships are never removed, even if he runs out of British ships.
4.5 Amphibious Units and land-based air units always come back as reinforcements two turns after they are eliminated When these units are lost, place them in the RETURNING LAND! AIR UNITS box on the second turn to follow.
4.6 The repair points that are available at each port on each turn are listed on the chart.
4.7 VICTORY IN THE PACIFIC is an eight turn game. An optional ninth turn is included in the rules and on the charts.
SEQUENCE OF PLAY
In each activity the Japanese player moves (or fires) first, then the Allied player This reflects the advantage the Allies had in being able to read the Japanese code.
5.1 Both players consult their ORDER OF APPEARANCE charts and place their reinforcements on the board Any listed REMOVALS are removed from play.
5.2 MOVEMENT SEQUENCE
5.21 The Japanese player moves his “patrolling” ships to sea (black silhouette side up), does repairs, and turns his “raiding” ships white side up in port After moving, he makes a “speed roll” for each “patrolling” ship that moved an extra sea area Then the Allied player moves his “patrolling” ships, does repairs, and turns his “raiding” ships white side up in port, after movement he makes his “speed rolls” for Allied “patrollers” that moved an extra sea area.
5.22 Land-based a,r units are placed one at a time, with the players alternating The Japanese player places one of his units first, then the Allied player places an Allied unit, and so on, skipping a player once he runs out of units
5.23 The Japanese player moves his amphibious units to sea, then the Allied player moves his amphibious units to sea
5.24 The Japanese player moves his “raiding” ships from ports and bases to sea, and after movement he makes “speed rolls” for his “raiding” ships that tried to move an extra sea area Then the Allied player moves his “raiding” ships from ports and bases and, after move.ment, makes his “speed rolls” for “raiding” ships
5.25 The player who has a submarine this turn places it on any sea area on the board
5.3 COMBAT SEQUENCE
5.31 The Japanese player selects the next sea area where combat will be fought Once combas begins in a sea area it is fought to a finish—with only one side remaining in that sea area — before combat proceeds to the next sea area
5.32 Combat within a sea area is fought in rounds Each round consists of one “day action” (in which only airstrike factors may attack) or one “night action” (in which only gunnery factors on surface ships may attack) or, rarely, one “day action” followed by one “night action” taking place on the same round
5.33 The players determine whether they are fighting a “day action” or a “night action” Their decision is in effect only for that round of combat in that sea area If it is a “night action” the Allied player must announce which of his aircraft carriers (if any) will be firing their gunnery factors
5.34 The Japanese player allocates all of his attacking forces for this “action” to their targets, then resolves their attacks and places the appropriate “damaged”, “disabled” and “sunk” markers on targets that were affected These markers do not go into effect until the end of that “action”, so the Allied ships and units get to return fire before the Japanese attacks take effect.
5.35 Then the Allied player allocates his attacks and resolves them, placing the appropriate markers as he goes.
5.36 At the end of the “action” all “damaged”, “disabled” and “sunk” markers go into effect.
5.37 if the players are fighting a “day action” followed by a “night action” in the same round, they follow steps 5 32 through 5 36 once for the “day action”, then repeat them once for the “night action” Note that ships lost during the “day action” are not available for the “night action”.
5.38 Submarine attacks, amphibious landings and “retreats” do not take place until after the round.
5.4 After each round of combat in a sea area, the following actions may be taken.
5.41 First, a submarine in that sea area may attack, returning to port as soon as it attacks.
5.42 Then, either player may choose to withdraw from that sea area, whereupon the other player may pursue, a player who is already pursuing may choose to break off his pursuit.
5.43 Finally any non-retreating amphibious units at sea in that area may land (the Japanese player lands first).
5.5 Combat rounds are repeated, steps 5 32 through 5 43, until one side no longer has units at sea in that sea area, and combat moves to the next sea area.
5.6 Any submarine that is still at sea is returned to port, it may attack before it is removed.
5.7 END OF THE TURN:
5.71 The players place their Control Flags on the sea areas they control and add up the POC they gain for the turn The POC TRACK is adjusted to show the new POC standing with the new POC added in.
5.72 Any ports or bases that have been surrounded by enemy-controlled sea areas for the last two turns are converted to enemy control (their Garrison counters are turned over to show the new control).
5.73 Any amphibious units still at sea may invade enemy island bases in (touching) their sea areas.
5.74 All ships and units still on sea areas must be returned to friendly ports or bases.
5.75 The players proceed to the next turn and repeat steps 5 I through 5 75 At the end of the eighth turn, the game is over and the player who is ahead in the POC standings wins the game.
6. MOVEMENT
6.1 When a ship moves, whether it is placed face up or face down depends on when it moves during the turn (The “steps” below refer to the TURN SEQUENCE section).
6.11 Ships that move to sea during step 5 2 (before air units are placed) are “patrolling” ships and are placed black silhouette face up.
6.12 Ships that move to sea during step 5.5 (after air Units are placed) are “raiding” ships and are placed white side face up Only ships in port, white side up, may move during step 5.5.
6.2 Each ship’s “speed” is used only for making “speed rolls” and during combat.
6.21 Both “patrolling” and “raiding” ships and amphibious units always start their move from a base or port by first moving onto a sea area that touches that base or port.
6.22 Ships and amphibious units may then move from that first sea area to an adjacent sea area.
6.221 All “patrolling” ships must make a “speed roll” if they move into a second sea area.
6.222 Red (Japanese) and Blue (United States) “raiding” ships do not have to make a “speed roll” to enter a second area.
6.223 Green (British, Australian and Dutch) “raiding’ ships do have to make a “speed roll” to enter a second sea area.
6.224 Amphibious Units do not have to make a “speed roll”, but they must stop in the second sea area they enter.
6.23 Japanese and United States “raid ing’ ships may move from the second sea area into a third sea area All ships that move three areas must make “speed rolls”.
6.2 Ships must always stop whenever they enter an enemy-controlled sea area, they can move no further that turn.
6.4 “SPEED ROLLS” When a ~speed roll” is made for a ship, one die is rolled and the number is compared to that ship’s speed. If the ship’s speed is higher than the die roll, then the ship passes the speed roll, and the ship successfully enters the sea area, if the die roll is equal or higher, then the ship fails the speed roll Note that speeds of 7 and 8 always pass.
6.41 “Patrolling” ships that fail enter the sea area but are turned white side face up—they are treated like “raiding” ships thereafter.
6.42 “Raiding” ships that fail must immediately return to a friendly port or base (see Section 10).
6.43 All speed rolls are done at the end of each step—all “patrolling” ships move before any “speed rolls” are made for them, all “raiding” ships move before any of them make “speed rolls”.
6.5 Air units do not “mo~e”—they can simply be placed in any sea area that touches any friendly port or base anywhere on the board Air units are placed one at a time, with the players alternating, the Japanese player placing first.
6.6 Submarines may be placed in any sea area, regardless of distance or enemy control.
7. COMBAT
7.1 Combat must be fought whenever both sides have forces in the same area.
7.11 Combat is resolved one sea area at a time Once combat begins in a sea area, combat is resolved only there until only one of the sides is left there.
7.12 The combat procedure is for both sides’ ships and units in the area to fire at each other once, after which losses are removed, then both sides’ forces fire again, and then new losses are removed, and so on until one side is gone in that area.
7.13 Each time both sides fire, it is called a “round” of combat A round represents one battle.
7.2 There are two different types of battles that can be fought, the type of battle determines which ships can attack that round.
7.21 “Night actions” are surface battles between capital ships with big guns, usually fought at night.
7.22 “Day actions” are battles fought by airstrikes from carriers and island airfields that stayed beyond gunnery range.
7.3 At the start of each round of combat each player chooses whether he wants a “day action” or a “night action” that round.
7.31 If the players agree, they fight that type of action.
7.32 If the players disagree, each rolls a die The player who wants “day action” adds one to his roll, and the player who currently controls that sea area (if any) also adds one to his die roll (for a total ~of +2 if he also wants a “day action”) The higher result from the die rolls and additions determines the type of “action” for that round.
7.33 If the result is a tie, the players fight a “day action” followed by a “night action” in the same round This combined battle represents those rare occasions when surface actions took place during the day, when airplanes could fly.
7.34 The determination of “day action” or “night action” applies only to that round of combat in that sea area, and the process is repeated for every round in every sea area The players may change their selections each time.
7.4 DESIGNATING TARGETS: During each “action,” first the Japanese player designates the targets for all of his attacking units, then he resolves all of his attacks, then the Allied player designates his attacks and then resolves them The results of both sides’ attacks go into effect only after the Allied player has finished attacking, so the Allied forces have the opportunity to return fire before the Japanese attacks take effect.
7.41 IN “DAY ACTIONS”:
7.411 Each ship or unit can use only its airstrike factor (if any) to attack.
7.412 Any enemy ship or land unit or air unit at sea in that sea area can be attacked (ships in ports can be attacked only during AIR RAIDS).
7.42 IN “NIGHT ACTIONS”:
7.421 Each ship can use only its gunnery factor to attack (air units cannot attack).
7.422 Land-based air units cannot be attacked.
7.423 Enemy amphibious units can be attacked only if all enemy ships are also being attacked during that “night action.
7.424 An enemy aircraft carrier (any ship with an airstrike factor) can be attacked only if all enemy ships that are not aircraft carriers are being attacked during the same “night action,” or if that aircraft carrier is firing its gunnery factor during that “night action” The Allied player must announce at the start of the “night action” which (if any) of his carriers are attacking, so they can be attacked by the Japanese units.
7.43 Each attacking ship or unit must execute its whole attack against only one enemy ship or unit per action Different attackers can attack different targets, or they can combine against the same target.
7.44 Each player resolves his attacks only after all of his attackers have been assigned to their targets Once he has started to resolve combat he cannot change any targets for that “action”, even if this means that he ends up attacking a target that has already been sunk.
7.5 COMBAT RESOLUTION:
7.51 In a “day action” each ship and land-based air unit attacks with a number of “shots” equal to its airstrike factor Gunnery factors do not attack.
7.52 During a “night action” each surface ship attacks with a number of “shots” equal to its gunnery factor Airstrike factors do not attack.
7.53 The attacker rolls one die for each “shot Results.
7.531 When the target is a ship or an amphibious unit, a roll of ~ DISABLES the target A “disabled” marker is placed on the target Land-based air units are never “disabled” and ignore a die roll of “5".
7.532 Against all units a roll of “6” is a HIT The attacker rolls again for each HIT, rolling one die per HIT, and the number he rolls on this second die roll is the number of damage points suffered by the target A “damaged” marker showing the appropriate number is placed on the target.
7.533 Place a “sunk”marker on a ship or amphibious unit when its “damaged” points exceed Its armor factor.
7.534 Place a “sunk” marker on a land-based unit when its “damaged” points equa/or exceed its defense factor.
7.535 A circle around a gunnery factor or an airstrike factor indicates that when that factor attacks a ship or an amphibious unit, all of the factor’s “shots” get the attack bonus (the attack bonus is ignored if the target is land-based air) When the die is rolled for a “shot” with the attack bonus 1 is added to the number rolled, so a “4” becomes a “5” that DISABLES the target, and a “5” or “6” is a HIT Note that I is added to the “shot’s” die roll—NOT to the damage die roll.
7.6 After both players have completed their attacks for that “action,” all the combat results markers go into effect.
7.61 “Sunk” ships and units are removed from the board.
7.62 “Disabled” ships and units must be placed on friendly ports and bases (see section 10).
7.63 “Damaged” markers on the same ship or unit are combined and replaced by one “damaged” marker showing the appropriate total damage.
7.64 Ships and units that are “sunk” and “disabled” are sunk, ships and units that are “disabled” and “damaged” take their full damage before returning to port.
7.7 EFFECTS OF DAMAGE:
7.71 Each point of damage reduces a ship’s or Unit’s speed by 1, down to the lowest possible speed of “1".
7.72 A ship’s gunnery factor loses the attack bonus if the ship has any damage.
7.73 If a ship has damage points equal to its armor factor, then its armor factor is reduced to one (a zero gunnery factor remains a zero) and its airstrike factor is reduced to zero.
7.8 In a “day action” followed by a “night action” the same round, the players do steps 7 4 through 7 6 once for the “day action,” then repeat them once for the might action Note that forces lost during the “day action” are not available for the “night action”.
7.9 END OF THE ROUND:
7.91 SUBMARINE ATTACKS A submarine gets one “shot,” with the attack bonus, against any ship or amphibious Unit in that sea area Combat effects take effect immediately. The submarine can wait and attack after any round of combat, but it attacks only once per turn and returns to port once it attacks Submarines cannot be attacked.
7.92 After each round (after submarine attacks, if any) either player may retreat, and the other player may pursue to continue the combat.
7.93 Finally, non-retreating amphibious units may land or invade, which is their only mode of attacking.
7.94 Combat rounds are repeated in the area until there is a victor there.
8. RETREATS
8.1 After each round of battle either player may retreat from that sea area (the Japanese player decides first).
8.11 When a player retreats, all of his units must retreat at the same time, and they are all obliged to continue to retreat until they escape or are “disabled” or “sunk”.
8.12 A player who retreats cannot control that sea area.
8.2 The retreating player can break his fleeing ships and units into groups of one or more ships (and units).
8.21 Retreating land-based air units escape immediately by themselves They cannot be grouped with ships or amphibious units.
8.22 Each different group flees separately, it cannot later rejoin with ships from other groups.
8.23 Each group flees at the speed of the slowest ship or unit currently with the group.
8.3 When one player retreats, the other player may pursue.
8.31 Land-based air units may not pursue.
8.32 The pursuing player specifies which of his ships are pursuing and which are not pursuing Each pursuing ship must be assigned to the particular group it is pursuing It cannot be reassigned to pursue a different group later.
8.33 A ship can pursue a particular group only if the ship’s speed is at least as great as the retreating group’s If the ship is slower, then that ship cannot continue to pursue that group.
8.34 Ships that were specified as not pursuing, or that stop pursuing, cannot pursue for the rest of that turn.
8.4 As soon as a group is not being pursued, it immediately returns to friehdly ports or bases(see section 10).
8.5 Each fleeing group fights a separate battle against its pursuers.
8.51 Normal combat rounds are fought, including and affecting only that group and its pursuers. Once begun, that group’s battle continues until it escapes or is sunk.
8.52 After each round, the retreating group may be split up into smaller groups, with the pursuer having the option of splitting up his forces to pursue Each split-off group flees and fights separately from the others.
8.53 After each round, the pursuer may have any of his ships stop pursuing the group he just fought.
9. AIR RAIDS (PORTS AND BASES)
9.1 Whenever a player retreats in a sea area, each of his ports and bases touching that sea area is treated as if it were a retreating group, (each port or base is a separate group) The other player may assign “pursuers” to attack such bases or ports.
9.11 Any ships or units in the port or base at that moment can be attacked.
9.12 The ships and units in port may not return fire.
9.13 The air raid consists of two rounds of “day action” combat, then the air r6id is over.
9.14 “Disabled” results are ignored.
9.2 A player who has the only forces in an area may conduct air raids in that area even if there was no retreat there, he just acts as tf there were a retreat and assigns his “pursuers” to the ports and bases touching that sea area.
9.3 Notice that land-based air cannot make air raids, each “pursuer” can be used in only one air raid (two rounds) per turn and if it does air raid, it cannot pursue other groups, and that a port or base touching several sea areas could be attacked by separate air raids from each area (All ships attacking a particular port or base from the same area must be combined into one air raid).
9.4 Important Ships (not air nor land units) that are attacked in port can take double damage before being sunk and removed from play.
9.41 A ship in port that takes damage greater than its armor factor is assumed to be “resting on the bottom” of the harbor The ship cannot move to sea, but it can be raised and repaired.
9.42 A ship that takes damage totalling more than twice its armor factor is eliminated from play in any case.
10. PORTS AND BASES
10.1 A ship or unit that is returning to harbor can return to any major (red) port on the board, or to any island base that touches the sea area the ship or unit is in.
10.11 A ship cannot enter a port or base that is enemy controlled.
10.12 United States ships can never enter Ceylon.
10.13 British ships must always return to (if friendly) Ceylon, Singapore, Saigon or Yokosuka Navy Yard British ships cannot return to other ports or bases Exception Victorious must return to Pearl Harbor.
10.14 If a ship has nowhere to return to, it is removed from the game.
10.15 Ports and bases that can be returned to are listed in each sea area on the board.
10.16 Ships may return to different ports and bases from the same sea area.
10.2 The above rules govern returning to port or base, whether the ship or unit is returning because it failed a “speed roll”, or is “disabled”, is retreating, it is the end of the turn, or the ship or unit had to retreat from a port that was just captured.
11. REPAIRS
11.1 Some damage points can be removed from ships, if they stay in port and do not move that turn.
11.2 The total number of damage points that can be removed in each port each turn varies from port to port (These totals are also listed on the ORDER OF APPEARANCE charts).
11.21 Six points per turn may be removed at Yokosuka Navy Base (only the Japanese may use these).
11.22 One point per turn may be removed at Ceylon, and one point per turn at Australia (only the Allies may use these).
11.23 Pearl Harbor’s repair capability increases by three points each turn (from 0 on turn one to 15 or turn 6 and thereafter). Only the Allied player may use these.
11.24 The points listed are the total number of damage points that can be removed in that port that turn. Example: in Ceylon, 1 damage point can be removed from one ship—not 1 point from each ship. A player may break up his repair points in a port to repair more than one ship at a time, if he wishes.
11.3 Ships with damage can still go to sea (if their damage does not exceed their armor factor). The damage does have its normal effects on the ship’s speed and combat ability.
11.4 Repair points can be used only in the port listed and on the turn listed. Repair points that are unused on one turn cannot be saved up to be used on a later turn.
12. LAND-BASED AIR
12.1 Land-based air units are placed on sea areas after “patrolling” ships have moved but before “raiding” ships have moved.
12.11 The players take turns placing one air unit down at a time, the Japanese player placing first.
12.12 Air units ignore distance and enemy-controlled sea areas and can be placed on any sea area on the board, except (see next rule):
12.13 A player can place an air unit in a sea area only if he controls a base or port touching that sea area. If he does not control a port or base in the sea area, he may not place an air unit there.
12.2 Land-based air units can attack and be attacked normally, but only during “day actions.”
12.21 Land-based air units do not get the “attack bonus” when they attack.
12.22 “Shots” fired at land-based air unit~ do not get the attack bonus even if the attacking air strike is circled.
12.23 Land-based air units are not affected by “disabled” results against them.
12.24 Land-based air units are “disabled” and must return to port immediately if they are in a sea area without a friendly port or base, so if the enemy invades their only base in that sea area they must return to port immediately.
12.25 Air units are “sunk” when their damage exceeds or equals their defense factor. (They are removed at the end of the action.)
12.3 “Sunk” air units are placed on the ORDER OF APPEARANCE chart and re-enter the game two turns later.
12.4 Land-based air units count for controlling a sea area.
13. AMPHIBIOUS UNITS
13.1 Amphibious units move to seajust before “raiding” ships. They move like ships, except they can always move two sea areas and they never make “speed rolls”.
13.2 Amphibious units do not take part in combat except as targets.
13.21 During “night actions” they may not be attacked unless all friendly ships in the area are also being attacked.
13.22 In other respects, amphibious units are treated like ship targets.
13.3 Amphibious units may “invade” enemy-controlled island bases (but not major ports).
13.31 Amphibious units may not “invade” if they have retreated or have been disabled that turn. ln these cases, the units must return to a friendly base or port.
13.32 A4nphibious units can “invade” after each round of combat in their sea area, or at the end of the turn (step 5.73 in the TURN SEQUENCE). They can also land on friendly ports or bases at these times.
13.4 An amphibious unit that lands on an enemy base is automatically eliminated.
13.41 Each invading amphibious unit that is eliminated causes one enemy amphibious unit in that base to be eliminated.
13.42 If there is no enemy amphibious unit in the base being invaded, then that base is immediately converted to friendly control (the invading unit is still eliminated). Other units may now land there without being eliminated.
13.43 Multiple amphibious units may invade at the same time. Example. 3 units invade a base containing one enemy amphibious unit. One invader is lost to eliminate the defending unit, one is lost to convert the base, and the third lands safely.
13.5 Amphibious units that are eliminated (either in “invasions” or combat), return two turns later.
13.6 Damage does not affect a unit’s ability to invade.
14. CAPTURING PORTS AND BASES
14.1 A major port is captured only when all the sea areas that touch it have been enemy-controlled for the last two turns.
14.2 Island bases are captured like ports, or they can be invaded.
14.3 When a port or base is captured, the following effects take place:
14.31 All ships in that port or base must immediately return to another friendly port or base.
14.32 Any amphibious units there are eliminated.
14.33 If that was the only friendly port or base touching a particular sea area, then all friendly air units in that sea area are “disabled” and must return to port.
14.4 Returning ships and units may land at a base or port as soon as it has been captured.
15. CONTROLLING SEA AREAS
15.1 At the end of a turn, a player controls a sea area if he has a “patrolling” ship or a land-based air unit on that sea area.
15.2 “Raiding” ships, amphibious units, submarines and ships and units on ports or bases do not count towards controlling a sea area.
15.3 A ship is “patrolling” if it is black silhouette side up; it is “raiding” if it is white side up.
16. SUBMARINES
16.1 Submarines may attack after a combat round or, if they have not yet attacked, after all other combat.
16.2 Each attacking submarine gets one “shot” with the attack bonus; it may attack any ship or amphibious unit at sea in its area. Combat effects take effect immediately.
16.3 Each submarine attacks only once per turn and then immediately returns to base.
16.4 Submarines can never be attacked.
17. ALLIED FLEETS
17.1 United States:
17. 11 New reinforcements are placed on Pearl Harbor.
17.12 Ships and units may return to any friendly port or base except Ceylon.
17.13 “Raiding” ships may move three sea areas, making a “speed roll” to enter the third.
17.2 British:
17.21 New reinforcements are placed on Ceylon. Ships in play must be removed on certain turns as specified on the ORDER OF APPEARANCE card.
17.22 Ships cannot return to any bases, nor to any ports except (when friendly) Ceylon, Singa -pore, Saigon or Yokosuka Navy Yard.
17.23 Exception: The Victorious is placed on Pearl Harbor and may return there.
17.24 “Raiding” ships may move only two sea areas, and must make a “speed roll” to enter the second.
17.3 Australian and Dutch:
17.31 Ships can return to any friendly port or adjacent base.
17.32 “Raiding” ships may move only two sea areas.
18. THE SURPRISE ATTACK
18.1 On the first turn of the game, the TURN SEQUENCE is altered slightly .to reflect the effects of the Japanese surprise attacks on Pearl Harbor and Indonesia.
18.2 Movement is executed in sequence normally, except:
18.21 The Japanese Pearl Harbor Raid force. cannot move—it must remain in the Hawaiian Islands. Only the ships and units at Yokosuka Navy Yard can move.
18.22 The only Allied units that can move are the five cruisers in Australia, Singapore and the Philippines. All other ships and units are frozen in place.
18.3 PEARL HARBOR: Combat starts with two rounds of “day action” air raids against the ships and air unit in Pearl Harbor. The two Allied cruisers in the Hawaiian Islands are ignored.
18.31 After the air raids, the Japanese player must announce whether he will withdraw or stay for more combat. If he retreats now he cannot be pursued.
18.32 Then the Allied player rolls one die for each of his “LOCATION UNCERTAIN” groups in turn. If he rolls a 1, that group is placed in the Central Pac~fic Ocean; if he rolls a 2 or 3 that group is placed in the Hawaiian Islands; if he rolls a 4, 5, or 6 the group is in the United States and will come in as reinforcements on turn 2—put it in the turn 2 box on the Allied chart. These groups are now normal ships occupying the areas where they were placed.
18.33 Then the Allied player may move any surviving ships and units from Pearl Harbor into the Hawaiian Islands sea area (ships with damage greater than their armor factor may not go to sea).
18.34 The I-Boat may now attack if it is in the Hawaiian Islands.
18.35 Finally, the Allied player may choose to retreat from the Hawaiian Islands (with all his ships and units at sea there) before any further combat. If he does retreat, he cannot be pursued.
18.36 After the first two air raids, the Japanese fleet can stay in the Hawaiian Islands for only two more combat rounds (because of fuel shortages). He may use these combat rounds for additional air raids on Pearl Harbor if the Allies retreat or are eliminated, but he must retreat at the end of the second round, no matter what. Combat and retreats during these rounds (and later) is normal—retreating units can be pursued.
18.4 INDONESIA: Next, the Japanese player executes two rounds of surprise attack air raids against all the Allied ships in Indonesia. All Japanese airstrikes in Indonesia can take part (including land-based air), and the Allied player cannot return fire.
18.5 This completes the surprise attack. Combat now reverts to normal in all sea areas where both sides still have forces.
OPTIONAL RULES
The following rules were not included in the normal rules section because they make the game longer and more complicated. P/ayers who are not deterred by these considerations may agree to employ any or all of them:
19. THE 9-TURN GAME
19.1 For those players who wish to extend the game beyond the period when the Japanese Navy was able to offer effective resistance, (Japanese effectiveness really çnded at the Battle of the Philippine Sea, which is turn 8 in the game). an optional 9th turn has been added to the game. Although this carries the game into a period when the Japanese Navy was effectively helpless, it does cover a number of points that are very interesting—so we included turn 9, along with the following rules changes.
19.2 Kamikaze attacks (turn 9 only):
19.21 Japanese land-based air units must make kamikaze attacks. When they attack, they get the attack bonus, but they are automatically eliminated.
19.22 Japanese aircraft carriers can also make kamikaze attacks; such attacks get the attack bonus but the attacking ship is removed from play. The Japanese player must announce at the start of each “day action” which carriers will make kamikaze attacks during that action.
19.3 For game balance, give the Japanese 1 extra POC each turn they control the Japanese Islands during the game.
20. TASK FORCES
20. I Often, forces operating in the same area were broken up into separate Task Forces with different but related missions (the Japanese in particular employed this tactic). To simulate this and the effects of reconnaissance in the game, use the following rules:
20.2 At the beginning of each round of combat in a sea area, both players (the Japanese first) group their forces—including land-based air—into Task Forces. Task forces can be rearranged each combat round.
20.3 Then the players specify which of their Task Forces will be attacking that round, and which will not attack. Both players must also specify any amphibious units that will invade that round.
20.4 Each player rolls one die for each of his Task Forces, to see if it has been sighted by the enemy that round.
20.41 A Task Force containing land-based air units or invading amphibious units is automatically sighted.
20.42 An attacking Task Force is sighted on a die roll of 1, 2, 3 or 4.
20.43 A Task Force that contains a “patrolling” ship is sighted on a roll of 1, 2 or 3.
20.44 Otherwise, a Task Force is sighted on a roll of I or 2.
20.5 First the players fight a normal “day action”, except that only attacking Task Forces may attack and only sighted Task Forces can be attacked.
20.6 Then the players fight a “night-action.” All sighted Task Forces must take part in the “night action,” and the players may add any of their attacking Task Forces to the fray. The “night action” is fought as one large, normal night action between these fortes, except that Task Forces that were not specified as attacking may not attack, and only Task Forces that were sighted or added to the “action” can be attacked.
20.7 Repeat steps 20.2 to 20.6 for each round, with the normal submarine attack and landings (only amphibious units announced as invading may invade).
20.8 A player may retreat with only part of his fleet and stay with the rest; the other player may then send pursuers. The fleeing and pursuing forces are handled normally, and cannot return to take part in the main battle again.
21. GUNNERY RADAR
All United States battleships (4-4-3’s or better) have the attack bonus when making gunnery attacks on turn 7 or later.
22. ISLAND COMBAT
22.1 When amphibious units invade enemy bases, they must immediately fight combat rounds until one side or the other owns the island. Units must be eliminated in combat—they are not automatically eliminated.
22.2 Each amphibious unit has a number of “shots” equal to its armor factor—-each damage point on the unit reduces its “shots” by 1.
22.3 When fighting on an island, each “hit” causes only I damage point—you do not roll a die for multiple damage caused by one hit.
22.4 An enemy island base marker (Garrison) counts as a combat unit with one “shot” per round. An enemy garrison cannot be attacked until it is the last enemy unit on the island. One “hit” on a Garrison knocks it out and converts control.
23. ANTI-AIRCRAFT
23. I Hits on carrier-based airstrikes are kept track of separately from hits on the carriers themselves.
23.2 An air strike (carrier or land-based) has its attack strength decreased by one “shot” for each damage point it has.
23.3 At the start of each “day action” both players specify (the Japanese player first) which airstrikes are attacking and which are defending during that action.
23.31 Defending airstrikes can attack only enemy attacking airstrikes.
23.32 All defending airstrike attacks are allocated and resolved like normal attacks on land-based air units; damage markers are placed on attacking airstrikes that suffer hits. This damage takes effect immediately.
23.33 After all defending airstrikes have attacked, surviving attacking airstrikes are allocated to their targets.
23.34 Each target then has one “shot”—no attack bonus—against each airstrike attacking it.
23.35 Battleships that are not being attacked also each get one “shot” at an attacking airstrike of their choice.
23.36 Damage on the airstrikes takes effect immediate/p.
23.37 The attacking airstrikes may then execute their attacks with what strength they have left.
23.4 Carriers that have lost all their airstrikes are “disabled” and return to port at the end of the action.
23.5 Eliminated air units do not automatically reappear in two turns. Instead, they (and carrier-based airstrikes) may be rebuilt. Each player may rebuild a number of airstrike factors equal to his whole repair capacity for that turn, (he can still use, his repair points to repair at the same time). Airstrikes are “repaired” at the same time and place other repairing is done, and the repairing units cannot move that turn.
When a carrier airstrike takes a casualty, it loses a “shot” immediately, whereas a land-based air unit attacks at full strength until eliminated. Both carrier- and land-based airstrikes can be rebuilt. ______________________________________________________________________________________________
THE GENERAL
Now that you know how to play the game, the next problem is probably who to play it with. We can help you with that problem and many others only through your subscription to our bi-monthly gaming journal, the GENERAL. In the GENERAL you’ll not only read all there is to know about this game, but will also learn about our dozens of other exciting simulation games of skill. Every 2 color, thirty-six page issue is jammed full of piofessional articles on the strategy and tactics of Avalon Hill gaming. Look and see what the GENERAL offers:
FREE ADVERTISING: Our Opponents-Wanted Column allows you to advertise free of charge for opponents, discontinued games, or competition of any sort. Each issue contains hundreds of ads which are read by our many readers nationwide. The fastest way to find an opponent for this game, whether it be across the street or the Atlantic Ocean, is in the pages of the GENERAL.
GAME DESIGN: Wonder why this game was designed the way it was? Read the GENERAL and find out! Our regular DESIGN ANALYSIS column features explanatory treatises by our designers. Only here can you find ready-to-play variations, new scenarios, and perhaps even more counters for this game.
QUESTIONS ANSWERED: In our Question Box you’ll find the only official source of rules interpretations and changes for this and our other games.
PRODUCT REVIEWS: Interested in other Avalon Hill games? Check them out in the Reader’s Buyers Guide. The RBG is a game review compiled by our subscribers at large --- the people who play the games. Realism, complexity, play-balance, and excitement level are only a few of the categories rated in the RBG.
WHAT’S HAPPENING: Like to know what’s going on in the gaming hobby? Each issue contains an installment of the “Ava/on Hill Philosophy” where we announce the new games, discuss possible new titles, and generally keep you informed. In addition, the INFILTRATOR’S REPORT keeps you posted on tournaments, conventions, club news, and unusual happenings.
VALUE: In every issue you’ll find a coupon worth $1.00 towards the direct mail purchase of all Avalon Hill products. All of this for only $7.50. How can you lose7 If you’re convinced, send $12.00 for a 2 year subscription and save $3.00 off the regular price. Since its inception in 1964, the GENERAL has stood the test of time. Increase your enjoyment of this and other Avalon Hill games many-fold with a subscription.
DESIGN CREDITS
Design Development: Richard Hamblen
Components Design’ Richard Hamblen, Donald Greenwood
Box Art: Jean Baer from a painting by R.G. Smith
Production Coordinator: Thomas N. Shaw -
Playtesting: Bill Barr, Sçth Carus, Jim Rumpf, James
Stahler, Donald Greenwood
Printing: Monarch Services, Colonial Composition,
Baltimore, Md.
Copyright 1977, The Avalon Hill Game Company,
Baltimore, Md.
Printed in The United States of America
