Outdoor Survival
INTRODUCTION
OUTDOOR SURVIVAL is a simulation of the essential conditions for staying alive when unprotected man is beset by his environment. It recreates real world conditions of the wilderness, and places trained and untrained people in emergency situations. The players have varying abilities to make the necessary decisions for survival. This is done through a number of scenario situations of increasing complexity, which state the abilities of the Player(s) to survive, and their objectives.Each scenario contains a “To Win” section explaining the goal of that particular game. These may be solo (for one person) or competitive (for more than one player). Each turn in the game represents one day; each hexagon on the mapboard represents a width of five kilometers (three miles).
OUTDOOR SURVIVAL is actually five different games. LOST is the “basic” game in which you must get out of the wilderness before lack of food and water ends your survival ability. In SURVIVAL you must get across a large wilderness area before your opponent. In SEARCH you must find someone who’s lost before the other search parties do. In RESCUE you must not only find the lost party, but by using your survival skills, get them out of the wilderness. In PURSUE you must, as the escapee, get out of the wilderness into a neutral country or, as the pursuer capture the escapee. Or, in an adaptation of this scenario, one or more players can take the part of hunters while one player assumes the role of their quarry.
GAME COMPONENTS:
1. Rules of Play Folder2. Primer on survival tips
3. 22” x 24” Mapboard of “the Wilderness”
4. One set of die cut playing pieces representing persons.
5. Mapboard Movement Chart — printed on Lid of Inside game box.
6. Five scenario cards
7. Four Identical Life Level Index chart cards
8. One die
9. Basic Game Rules Card: Newcomers to simulation gaming should play the Basic Game first. Once mastered, move onto the regular game described in this Rules of Play Folder.
Parts & Brief Description
The Primer
Survival tips; but not used in the play of the game. For reading before and after playing.THE MAPBOARD
The mapboard is a representation of approximately 13,200 square miles of wilderness - a tract that includes all of the deterrents inherent within, such as woods, rough terrain, desert, swamp, river, and mountains. A hexagonal grid is superimposed to determine location and movement much in the manner of squares on a chess board. We will refer to these “squares” hereafter as “hexes.”DIE CUT PLAYING PIECES
Each set of colored pieces represents one person, hereafter called “Person counters.” The letters A through 0 reflect the physical condition of that person, We will hereafter refer to physical condition as “Life Level.” Life Level “A” is the peak condition which can deteriorate if that person’s daily requirements of food and water are not satisfied. The number printed on each Person Counter is its “Movement Allowance” and it tells how many clear terrain mapboard hexes a person can move through when he is in that life level. For example, a person starting out in Life Level “A” can move through 6 clear hexes per turn. However, if the physical condition has been weakened to, say Life Level “D,” he could move only 4 clear terrain hexes per turn. Each player also has a “Food Index” counter and a “Water Index” Counter which are used on the Life Level Index Chart cards. Counters labeled “Life Level Index” are used only when employing optional rules. Set them aside for now.LIFE LEVEL INDEX CHART
Each player takes one chart, all charts being identical. Before starting the first turn, each player places all of his Person counters on the row of boxes labeled “LIFE LEVEL INDEX.” He also places a Water Index Counter on the “Start Here” box of the Water Index row, doing likewise with his Food Index counter.MAPBOARD MOVEMENT CHART
This chart is printed on the lid cover of the inside game box and should be kept in view at all times, or until such time as it has become memorized by each player. It determines exactly how many hexes a person may travel through, depending upon the “difficulty” of specific terrain.BASES AND OUTPOSTS
The “houses” on the mapboard are bases. These serve simply as markers to set up Person counters at the beginning of a scenario. Outposts are bases of unlimited supply. Players use blank counters to indicate these outposts. They are immobile, and may be placed anywhere on the board at the beginning of the situation as called for by the respective scenario.SCENARIO CARDS
There are actually five different games in OUTDOOR SURVIVAL, graduating in expertise from No. 1 to No. 5. Instructions for play relevant to an individual scenario are printed on each card itself. When selecting a specific scenario, it must be kept out on the table in easy view of each player.1. LOST - This recreates the situation of someone who, while camping or hiking has lost his way and run out of supplies. This situation could also apply to someone stranded in a desolate area through an accident.
2. SURVIVAL - This situation is actually something of a variation on the LOST situation. In this case the lost people must traverse a wide tract of wilderness in order to get home. This situation could also represent a “race” between people who like to live dangerously.
3. SEARCH - This is one of the most common real life situations. Someone is lost and you have to go looking for him. This situation assumes that once the lost party is found, transportation can be provided to lift rescued and rescuer to civilization.
4. RESCUE - A variation of SEARCH in which the rescuer, having found the lost party, guides them to safety through the wilderness. For the search phase of this game it is assumed that the searchers have the appropriate equipment and supplies.
5. PURSUE - Offers two adaptations on which players can add their own variations. For the war game buff, this game provides the ingredients for an escaped-prisoner-of-war-chased-by-guards situation. For the outdoorsman, the adaptation applies to hunters pursuing a beast.
It is suggested that the WILDERNESS ENCOUNTER situations on the reverse side of each scenario card be used only after becoming familiar with the play of several scenarios. Then consult the OPTIONAL RULES section of this folder.
How to Play
SEQUENCE OF PLAYStep 1: Select one of the five scenarios, It should be kept in full view, or passed around to each player when it becomes that player’s turn to play. Place Person counters on the map-board where so stated by the scenario card. Place correctly all Life Level counters.
Step 2: Determine (by roll of a die) the order in which each player takes his turn, The player rolling the higher number moves first. Game length is determined in the “TO WIN” section of the scenario card.
Step 3: Refer to the DIRECTION ABILITY chart of the scenario card and roll the die. This tells you in which direction you must move. How far you can move is determined by your counter’s movement allowance (the printed number).
Step 4: Refer to the NECESSITIES chart of the scenario card. Then determine whether or not the current day’s needs for food and water have been satisfied as a result of your move. Adjust your Food In’Jex and Water Index counters accordingly on the Life Level Index card,
Step 5: If movement of your Food Index and Water Index counters have triggered a change in your Person counter Life Level, make the proper exchange between the Person counter that is in play on the mapboard and one that is on the Life Level Index row of your Life Level Index card.
Optional: (Steps 6 and 7 are for use with the optional rule only).
Step 6: Having completed your normal movement turn, roll the die once. If you roll a 1, 2, 3, or 4 your turn has ended and your opponent may now return to step 3 and proceed normally. However, if you roll a 5 or 6 you must play the WILDERNESS ENCOUNTER chart. You then announce which of the three columns you’ll play (NATURAL HAZARDS, ANIMAL/INSECT, or PERSONAL) and then roll the die. Adjust your Food Index and Water Index counters accordingly.
Step 7: Repeat Step 5.
Step 8: Repeat steps 3 to 7 until game is concluded.
HOW TO MOVE PERSON COUNTERS
Person Counters must be moved as far as possible in accordance with its direction instructions, and in accordance with the limitations of its movement allowance and the Mapboard Movement Chart. Procedure: Move each unit individually, tracing the path of movement through the hexes.CASES:
(A) Movement is calculated in terms of hexes. Basically each unit expends one movement point of its total movement (point) allowance for each hex entered. To enter some types of hexes requires more than one movement point; see the Map-board Movement Chart printed on the Box Lid.(B) In any turn, the Player may decline to move his Person counter at all, and remain stationary in a hex. This must be decided before he rolls for his direction instructions, unless stated otherwise on the Direction Ability chart.
(C) Person counters must be moved in accordance with their direction instructions, as given to them by the DIRECTION ABILITY chart and a die roll.
(D) Person counters may move over different types of terrain as long as they have sufficient movement points to enter that particular type of terrain. Thus, a Person counter with a movement factor of 2 could not move at all if surrounded by mountain or swamp hexes.
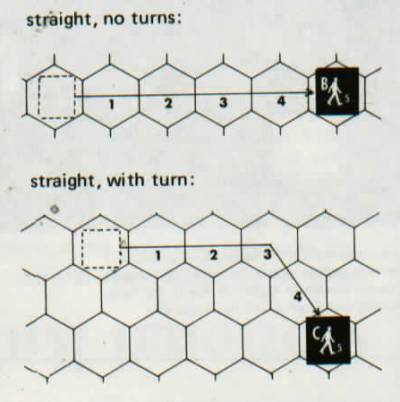
(E) Person counters must be moved in the direction instructed. Movement may be in two ways: straight, with no turns; or straight with turns. Examples of these are:
(F) If forced to go off the board by the dictates of the Random Direction chart when not desirous of doing so, you may opt to remain stationary instead.
(G) Person counters may never make a 180 turn, that is, re-enter a hex just left. Counters must move straight in the new direction after turning. They may turn at any point after the first hex is entered, but it is never required for them to turn.
TRAIL MOVEMENT
Whenever a unit moves into a hex containing a trail, the player has the option of ignoring the dictates of the Direction Ability chart and continuing his movement along that trail.Cases:
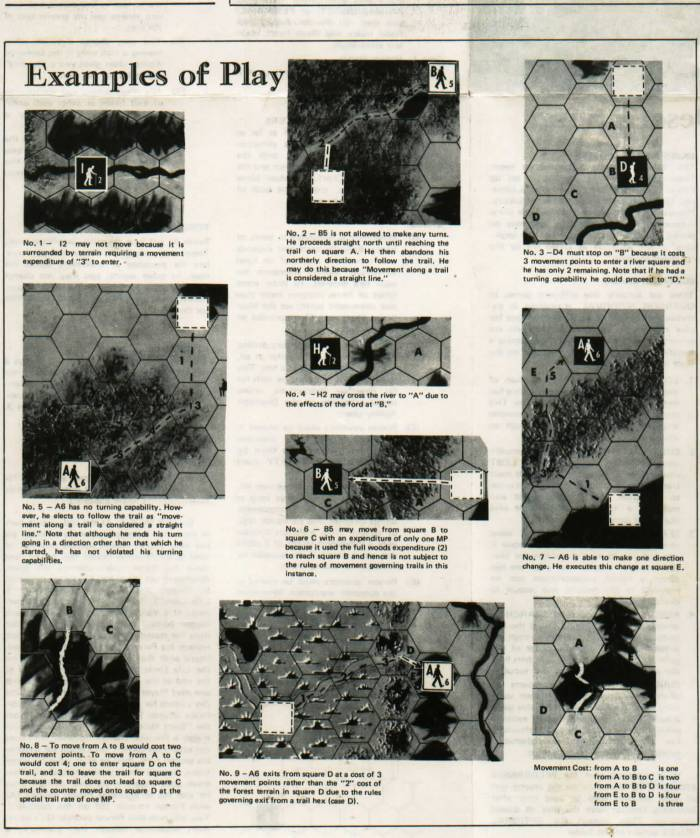
(A) Turns in movement incurred by bends or twists in a trail do not count against movement limitations as called for by the Direction Ability chart. In other words, movement along a trail is considered a straight line. When you land on a trail hex you may follow that trail regardless of turns.(B) When leaving a trail you must move straight ahead in the direction that the trail points to, unless you have a “turning” ability in that turn due to your roll on the Direction Ability chart.
(C) When traveling on a trail you may ignore the results of the Random Direction chart. However, you still roll for the Direction Ability chart to see what your “turning” capabilities are should you wish to leave the trail that turn or should the trail end.
(D) If you leave a trail hex after having entered that hex at the trail movement rate of 1 point per hex, in a direction other than that which the trail points to, you do so at the movement cost of the other terrain in that trail hex. Exception: If the movement cost of the terrain moved into is greater than that of the terrain in the exited trail hex, you always use the greater cost of the two.
(E) You may change direction when leaving a trail only if the Direction Ability chart gives you a “turning” capability for that turn.
(F) Any disagreement over the location of exit hexes or other such ambiguities may be resolved by a friendly roll of the die.
(G) You may enter a trail hex at the movement cost of one only if you enter that trail hex through a hex side which is clear terrain or pierced by a trail.
FORDS
Fords do not have the same qualities as trails. They merely negate the river in that particular hex for purposes of movement across the river. In other words, you may not change direction on a ford hex unless the Direction Ability chart gives you a “turning” capability for that turn.RIVERS
The cost of entering a river hex is always 3 movement points regardless of whether or not the river is actually crossed. Exception: Swamp hexes which include rivers are traversed at a cost of 4 movement points, not 3.HOW TO USE THE LIFE LEVEL INDEX CHART
Each player has his own card and places his own Person counters, Food Index, and Water Index counters where indicated.WATER INDEX: At the end of each turn in which the current day’s needs for water are not met, (Note: swamp squares may not be used to satisfy water needs) that player must move his Water Index counter one block downward (to the right). Blocks are separated by “trigger points” (where it might say “1 Life Level”). Whenever the downward movement of a Water Index counter crosses such trigger points, that player’s Person counter loses the stated life level. That means he must replace his Person counter now on the map-board with that of the next letter shown on the Life Level Index row. For example, if at the end of the first turn (each turn represents one day) Player No. 1 did not satisfy that first day’s needs for water, he must move his Water Index counter into the next block down from the “Start Here” block. That move does not trigger a life level change. However, if he does not satisfy his current day’s needs for water in his second turn, then he must move his Water Index counter down to the third block. That move does trigger a life level change. Thus he also has to exchange Person counter (A) with Person counter (B) on the mapboard. You will note that Person counter (B)’s movement allowance reduces that player to a movement allowance of 5 hexes per turn instead of the previous 6.
It is possible that a person could trigger a change in life level on both the Food and Water Indexes on the same turn. In such cases, the effects are added together and the resulting sum is subtracted from the Life Level Index. In cases where a player is able to satisfy more than just the current day’s needs, he may recover life levels by passing trigger points in the opposite manner (upward, or to the left). When that player is instructed to recover steps on the Water Index, he moves his Water Index counter to the left one block for each step he is to recover, He then substitutes for his Person counter accordingly if a trigger point has been crossed. For example, if a player’s Water Index counter is on the fifth block, and he is instructed to “recover 2 steps,” that counter is moved back to the 3rd block. And if his mapboard counter is at Life Level “D,” it is replaced with Life Level “C.”
FOOD LEVEL: Treat the same as for Water Index. You will note, however, that one’s physical condition deteriorates at a much faster rate from lack of water than from lack of food. Again, as with water, it is possible to recover lost life levels. However, in no case may food or water indexes “regain” food or water further to the left than the “start here” boxes,
LIFE LEVEL INDEX: Counters A through 0 reflect that player’s physical condition. No more than one of the 15 may be on the mapboard at any one time. If a player has counter 0 on the mapboard, and he is required to lose one or more life levels, he has not “survived” and is automatically out of the game.
You are NOW ready to play OUTDOOR SURVIVAL. “Examples of Play” (111kb) are for ready reference. “Optional Rules” (below) may be adopted to add realism to the play of the basic game.
For current replacement parts list send a stamped, self-addressed envelope marked “parts list” to: The Avalon Hill Company, 4517 Harford Road, Balto., Md. 21214.
Optional Rules
WILDERNESS ENCOUNTER CHART
The Wilderness Encounter aspect is adopted at step 6. At the end of your normal move in each turn, roll the die once to determine if you must play the Wilderness Encounter chart. If you roll a 1, 2, 3, or 4 your turn has ended and your opponent should proceed immediately to step 3. If you roll a 5 or 6 you must play the Wilderness Encounter chart. Call out — verbally — one of the three encounters you wish to take a chance on. Then roll the die once, and cross index the die roll with the proper encounter column. Adjust the Food and Water Indexes and the Life Level counters accordingly. Your turn ends and play continues in like manner to the next player. You may never ignore the gains or losses called for by the Wilderness Encounter chart, even if you currently occupy a food or water hex.When the Wilderness Encounter chart calls for the loss of a “life level,” the Food and Water Indexes are not affected. Simply replace the person counter with a lower Life Level counter making no additional changes in the Food or Water Indexes, This simulates a weakening of condition resulting from causes other than lack of food or water.
You will note that we give you a choice in the selection of the encounter for the sake of adding strategy to the play of the game. But in real life, travelers would not have this control over Wilderness Encounters. If you wish to simulate this aspect,substitute another die roll for the choice: a roll of 1 = Natural Hazards; 2 & 3 = Animal-Insect encounters; 4, 5 & 6 = Personal elements,
You will note that the three encounter options provide for a variety of decision making ranging from the conservative to the panic stage. They are, of course, slanted according to the level of players’ expertise in wilderness skills.
Encounters reflected under Natural Hazards include forest fires, flash floods, and inclement weather. Negative elements under Animal/Insect Encounters involve poisonous snake and insect bites, wrecked shelters and supplies ruined by marauding animals, with positive elements reflecting a person’s ability to successfully obtain animals and insects for food. Under Personal Encounter, the negative elements reflect bodily injury, and consumption of polluted water and poisonous food, with positive elements showing a person’s ability to accumulate food and water surplus, provide shelters, build fires, and apply proper medical treatment to one’s self.
LIFE LEVEL INDEX COUNTER:
Whenever the Wilderness Encounter chart calls for the loss of a life level, it may be assumed that this is the result of an injury which can not be “healed” during the course of the game. When using this optional rule the Life Level Index counter is placed on box “A” on the Life Level Index to start the game. For each loss of life level called for explicitly by the Wilderness Encounter chart, the Life Level Index counter is moved one “box” further to the right. The Life Level Index counter simply represents the highest or “peak” stage that a player’s Player counter may be at during the game. If the Life Level Index counter is on “box B” on the Life Level Index, then you may never “regain” life levels past the “B” stage. Food and Water Indexes may continue to be moved upward regardless of the Life Level Index counter but “trigger points” are ignored if the resulting gain in life levels would call for the use of a Person counter greater than that allowed by the Life Level Index counter,BASES: If you find that survival in any of the scenarios is too difficult to achieve, you may wish to consider each “base” hex to have the same advantages as a combination food and water hex. Furthermore, by remaining on that particular hex for two additional turns, you may regain one food and one water step. This optional rule would be most useful in the SURVIVAL scenario.
Scenario 6: One of the most interesting aspects of OUTDOOR SURVIVAL is the opportunity it provides for devising your own scenarios. Once you have mastered the mechanics of play, many additional ideas, providing more testing of outdoor knowledge and skills, will come to you. Integrating these situations with the standard games will add pleasure and skill-sharpening to the playing.
To illustrate this possibility we will briefly outline the rules for a “man vs. beast” pursuit scenario below.
For the purposes of this illustration we will assume the “beast” to be a whitetail buck and the pursuer a deer hunter. To reflect the greater speed and agility of the deer, double the movement factors of the animal’s “person counter” for all levels. The animal satisfies its current day’s food needs every time it ends movement on a plain or forest square. Water needs are satisfied by passing through or ending movement on a catch-basin, stream hex, or swamp square. The deer, not having the reasoning powers of a man, must roll the direction ability chart used in the Lost Scenario on every turn. The deer may not leave the board — the game continues until either the prey is caught or the pursuer is reduced to life level G — at which point he admits defeat and gives up the hunt. The hunter, for his part, uses the direction ability and necessities chart found in the Search scenario. To successfully conclude the scenario, the hunter must occupy a clear terrain hex adjacent to the deer (at which point it is assumed his rifle will bring the hunt to a successful conclusion) or else actually occupy the same non-clear terrain hex as the deer (i.e., swamp, mountains, forest). In addition, to simulate the difficulty of a rifle shot in heavily wooded terrain, force the hunter to roll a 1, 2, or 3 to make a successful shot whenever the hunter is in a woods hex.
It must be emphasized that the above “scenario” should, by no means, be considered a hard and fast rule. It was included only to show you the possibilities for innovation that exist in the creation of new scenarios. Indeed, the creation of “variant” scenarios is one of the reasons why OUTDOOR SURVIVAL is such an excellent game for solitaire play. It’s open-endedness should make it a favorite for those who lack opponents.
HINT: Another varient on the same theme could be easily constructed by changing the scale of the mapboard to 1 hex equals 100 yards, thus paving the way for chance tables which could reflect the accuracies of rifle fire at ranges of 100 through 500 yards. As you can see, the possibilities are endless, and the situations limited only by the powers of one’s imagination.
